概念:mybatis主要完成定制化的sql,存储过程以及高级映射的优秀的持久层框架,通俗来讲就是与数据库进行交互的框架。
作用:1.封装jdbc操作 2.利用反射完成sql语句之间的相互转换
mybatis的配置文件:1.核心配置文件,一般命名为:mybatis-config.xml或者sqlconfig.xml
一、环境入门搭建
-
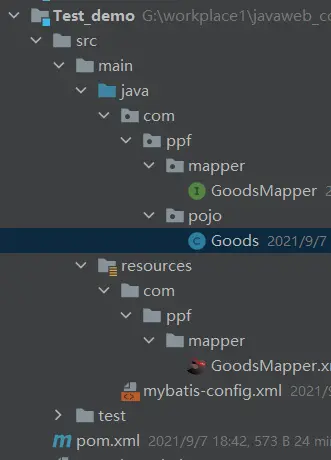
目录截图

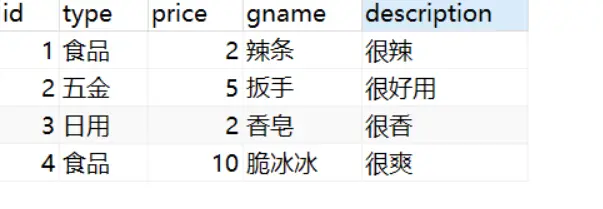
1.首先创建一个maven项目,接着创建一张数据表,导入我们所需要的坐标

junit junit4.12 test org.mybatis mybatis3.5.5 test 2.创建一个放实体类的包,这个包为com.xxx.pojo
3.此外还要接着创建一个包,com.xxx.mapper(这个包可以用来放接口)
4.在resourses资源包下创建核心配置文件mybatis-config.xml
5.在resourses资源包下创建一个和接口同级目录的包用来存放接口映射文件GoodsMapper.xml
二、修改配置文件
因为我的配置文件都已经配置了模板,如果第一次配置的话最好去mybatis官网进行配置,因为粘贴的会容易导致版本错乱。
mybatis-confog.xml(这个文件主要是配置数据源,我们一般使用jdbc,这个可以一定程度上进行简化)
- 这个是一个最基础的核心配置文件,不可缺少
GoodsMapper.xml (这个文件是接口的映射文件,这其中用到了反射的知识)
三、开始编码
1.编码可以从实体类开始,我一般习惯于从接口开始,报错的时候,缺什么补什么,但是作为mybatis入门案例,我们就从实体类开始
Goods.java
package com.ppf.pojo;
public class Goods {
    private Integer id;
    private String type;
    private Integer price;
    private String gName;
    private String description;

    public Goods() {
    }

    public Goods(Integer id, String type, Integer price, String gName, String description) {
        this.id = id;
        this.type = type;
        this.price = price;
        this.gName = gName;
        this.description = description;
    }

    public Integer getId() {
        return id;
    }

    public void setId(Integer id) {
        this.id = id;
    }

    public String getType() {
        return type;
    }

    public void setType(String type) {
        this.type = type;
    }

    public Integer getPrice() {
        return price;
    }

    public void setPrice(Integer price) {
        this.price = price;
    }

    public String getgName() {
        return gName;
    }

    public void setgName(String gName) {
        this.gName = gName;
    }

    public String getDescription() {
        return description;
    }

    public void setDescription(String description) {
        this.description = description;
    }

    @Override
    public String toString() {
        return "Goods{" +
                "id=" + id +
                ", type='" + type + ''' +
                ", price=" + price +
                ", gName='" + gName + ''' +
                ", description='" + description + ''' +
                '}';
    }
}
2.提出一个需求:
查询所有的数据(这是最简单也最容易上手的需求)
GoodsMapper.java
package com.ppf.mapper;
import com.ppf.pojo.Goods;
import java.util.List;
public interface GoodsMapper {
    List selectAll();
}
- 注意:这里selectAll()这个方法会报错,不要紧,我们使用alt+回车键,就会在GoodsMapper中自动创建一个select标签,在里面写sql语句就可以
- 注意:这里的goods会报红,你可以选择忽视,如果不能接受,你可以在idea的右侧菜单栏database中连接数据库,它就会恢复正常
3.接着我们来写一个测试类(可以在test下的java中创建一个Test.java)的测试类,然后在pom.xml中导入junit的坐标
TestDemo.java:测试类
import com.ppf.mapper.GoodsMapper;
import com.ppf.pojo.Goods;
import org.apache.ibatis.io.Resources;
import org.apache.ibatis.session.SqlSession;
import org.apache.ibatis.session.SqlSessionFactory;
import org.apache.ibatis.session.SqlSessionFactoryBuilder;
import org.junit.Test;

import java.io.IOException;
import java.io.InputStream;
import java.util.List;

public class TestDemo {
    @Test
    public void selectAll() throws IOException {
        //1. 加载mybatis的核心配置文件,获取 SqlSessionFactory
        String resource = "mybatis-config.xml";
        InputStream inputStream = Resources.getResourceAsStream(resource);
        SqlSessionFactory sqlSessionFactory = new SqlSessionFactoryBuilder().build(inputStream);

        //2. 获取SqlSession对象,用它来执行sql
        SqlSession sqlSession = sqlSessionFactory.openSession();
//        3. 执行sql
        GoodsMapper mapper = sqlSession.getMapper(GoodsMapper.class);
        List goods = mapper.selectAll();
        System.out.println(goods);
        //4. 释放资源
        sqlSession.close();
    }
}

总结:这就是一个最基本的mybatis项目,其中没有用到起别名,也没用到包扫描,甚至没用到注解,但是作为入门更有利于大家的理解。
【信息由网络或者个人提供,如有涉及版权请联系COOY资源网邮箱处理】


暂无评论内容